How to Fix: CPU Not Compatible with Windows 10 Error
How to Fix: CPU Not Compatible with Windows 10 Error

Submitted by Dennis Faas on Fri, 06/26/2015 - 11:11
Infopackets Reader Samantha M. writes:
" Dear Dennis,
I have the 'Get Windows 10' app running in my tray bar, but when I click on it, it says my CPU is not compatible with Windows 10. How can that be? My PC is currently running Windows 8.1 Pro and only 1 year old -- so I don't understand why my CPU isn't compatible with Windows 10? I read somewhere that if you have Windows 8 or 8.1 that the CPU should automatically be compatible with Windows 10 as the hardware requirements are virtually the same. Any ideas? My CPU is the Intel Core i7 4790K. "
My Response:
You are correct: if your PC can run Windows 8 or 8.1, then the CPU is automatically compatible with Windows 10, even if the "Get Windows 10" app reports that your CPU is not compatible. The reason it says your CPU is not compatible is due to a bug in the "Get Windows 10" app, and there are two patches available for that (one for Windows 8 and another for Windows 7). I'll explain how to fix the bug in Scenario #1 (below).
On the other hand, if you are NOT already running Windows 8 or 8.1, you may need to enable a setting in the computer's BIOS to ensure that it passes the Windows 10 CPU compatibility check when you click on the "Get Windows 10" app. I'll refer to this as Scenario #2.
Both scenarios are described below.
Scenario 1: How to Fix the Windows 10 Compatibility Check (Bug)
The bug fix described below applies to Windows 8 and Windows 7 systems.
On June 1st, 2015, Microsoft released the "Get Windows 10" app which appeared in the tray bar next to the clock (denoted by a white Microsoft logo). Unfortunately the "Get Windows 10" app had problems recognizing some CPUs as being compatible with Windows 10, and therefore produced a false negative with an erroneous message stating: "Here's why Windows 10 can not be installed on this PC: The CPU isn't supported."
On June 2nd, 2015, Microsoft released an update to fix the "Get Windows 10" app, but the update may not have been automatically downloaded as it was originally marked Optional, then later changed to Recommended. If you have Windows Update set to manually download updates, then you would have to manually select this update to have it installed.
Please note that the patch is only available through Windows Update. For Windows 8 and Windows 8.1 systems, the patch is KB2976978; for Windows 7 SP1 systems, the patch is KB2952664. The links to each of the KB articles only describe the patch but do not have a download.
How to Check if you Have the Patch for Windows 10 CPU Compatibility Test
To check if you have the "Get Windows 10" patch installed already, do the following:
- Click Start and type in "View installed updates" (no quotes) and then click on the icon that says "View installed updates".
- When the Installed Updates window appears, go to the Search box at the top right, and type in "KB2976978" (no quotes) if you have Windows 8, or "KB2952664" (no quotes) if you have Windows 7. If you see "Update for Microsoft Windows KB2976978" (Windows 8) or "Update for Microsoft Windows KB2952664" (Windows 7) appear in the results, then then you already have the update installed. You can try and apply the patch manually again using steps described further down in the next heading "Apply the Patch to the Get Windows 10 App".
If you do not have the update, then you need to do the following:
- Click Start and type in "Windows Update" (no quotes).
- The Windows Update window will appear; in the top left, click the link that says "Check for Updates"
- If there are no new updates, then you will be taken back to the Windows Update main window again. If that's the case, click on the link that says "Show all available updates" which is located somewhat in the middle of the window.
- Scroll through the list of available updates and look for KB2976978 if you have Windows 8, and KB2952664 if you have Windows 7. Pay attention to the "Optional Updates" link (if you have updates already ready for download), otherwise look for the "Optional Updates" heading in the list of all available updates.
- Once the patch has downloaded, you may need to reboot.
Proceed to the next step.
Apply the Patch to the 'Get Windows 10' App
Even if the patch (above) has been downloaded, it will still need to be applied to the "Get Windows 10" app. Normally this happens within a day or two with the Windows Task Scheduler, but you can manually apply it using an Administrative command prompt.
To do so:
- Click Start and type in "cmd" (no quotes, and do NOT press Enter). Wait for the Command Prompt or CMD.EXE to appear in the list, then right click it and select "Run as Administrator".
- Highlight the text below with your mouse:
schtasks.exe /Run /TN "\Microsoft\Windows\Application Experience\Microsoft Compatibility Appraiser"
- Right click over top of the highlighted text and select "Copy" from the dialogue menu.
- Go to the Administrative command prompt you opened up in Step #1. Right click in the middle of the command prompt window, and select "Paste" from the dialogue menu. The text you copied in the previous step should now have paste into the command prompt. If it did not, repeat the step previous and try again. If it did, then press Enter on your keyboard to have the command execute on the command prompt.
- Now, go to the "Get Windows 10" app (next to the clock in the tray bar) and right click over top of the white Microsoft Logo. Select "Check your upgrade status" and it should give you a message stating that you can reserve your copy of Windows 10.
If the app still reports your CPU isn't compatible, will need to double check your hardware settings described next in Scenario #2.
Scenario #2: How to Ensure your CPU is Compatible with Windows 10
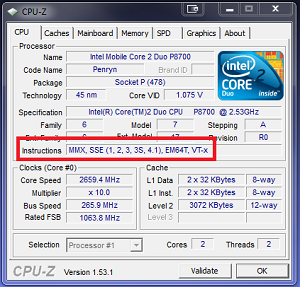
If you receive the message that your CPU is not supported in Windows 10, it may be because two reasons. First, you need to ensure that your CPU supports PAE, NX and SSE2 instruction sets. Secondly, you may need to enable a setting in your computer's BIOS (described further down).
To test for PAE, NX, and SSE2, download a program called "CPU-Z" and run it. On the main window, look under the "Instructions" heading for SSE2, EM64T (which also indicates the processor supports PAE) and either VT-d or VT-x, which is required for NX support. If you have all 3, then you are good to go.
If your CPU is compatible, proceed to the next step to ensure that your NX bit is set in the BIOS.
How to Set the NX Bit (No Execute Bit) in BIOS
Even if your CPU supports NX (no execute bit), you may still need to enable the NX feature in BIOS in order to pass the Windows 10 CPU Compatibility check (via the "Get Windows 10 app"). To access the computer's BIOS, you will need to reboot and then press a specific key (usually DEL, F2, or F12).
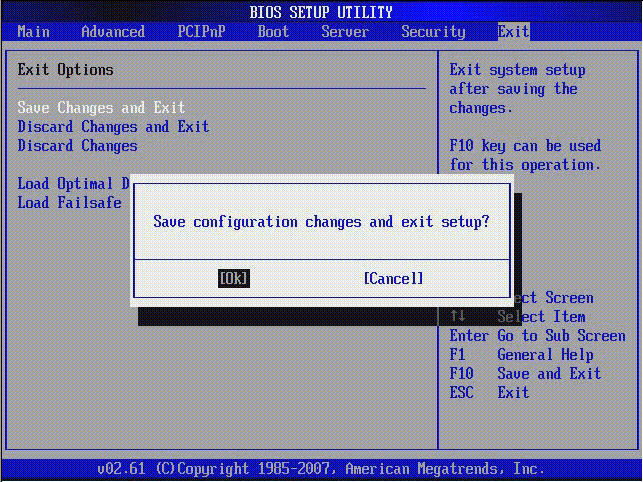
Once you are in BIOS you will need to look for the NX setting - it is usually shown in the 'Advanced Configuration' menu (or similar), though every BIOS is different, so the heading may also be different. Also note that the NX (no execute bit) can have multiple names in a BIOS, including EDB (Execute Disabled Bit), Execute Disabled Memory Protection, EVP (Enhanced Virus Protection), and No Execute Memory Protect.
Keep your eyes peeled for all of those names and then enable the setting. Then, choose to exit the BIOS and (important!) save your changes. Boot the computer as normal and then try the "Get Windows 10" app again.
To do so: click on the "Get Windows 10" app near the tray bar, then right click and choose "Check your upgrade status" link to see if your CPU passes. If it does not, refer to Section #1 in case you need to patch the "Get Windows 10" app so it properly recognizes your CPU.
How to Force NX Bit in Windows
The final tip in this long saga is to force the NX bit inside of Windows, but only if your CPU supports it. I've had people email me and say they've tried all the steps on this page (above), but the "CPU Not Supported" error still persisted. This is the final thing that made it work.
To do so:
- Click Start and type in "cmd" (no quotes, and do NOT press Enter). Wait for the Command Prompt or CMD.EXE to appear in the list, then right click it and select "Run as Administrator".
- Highlight the text below with your mouse:
bcdedit.exe /set {current} nx AlwaysOn
- Right click over top of the highlighted text and select "Copy" from the dialogue menu.
- Go to the Administrative command prompt you opened up in Step #1. Right click in the middle of the command prompt window, and select "Paste" from the dialogue menu. The text you copied in the previous step should now have paste into the command prompt. If it did not, repeat the step previous and try again. If it did, then press Enter on your keyboard to have the command execute on the command prompt.
At this point please bookmark the page in your browser, as you will need to restart (reboot) the machine after executing the above command. When the reboot is complete, come back to this page and proceed to the next step.
Check for a BIOS Update for your Motherboard
Although very rare, you may need to flash (update) your BIOS if there is a "windows 10 compatibility" BIOS update for your computer's motherboard. To determine if this is the case, do the following:
- Use CPUz to
note the make and model of your computer / laptop's motherboard, as well as
the
BIOS firmware version (pic).
- Go to the manufacturer's website and browse through the BIOS / firmware updates to see if there is (a) an update to your BIOS firmware and (b) those updates make any mention of a Windows 10 compatibility / update / fix. If so, download the update and flash the BIOS. Instructions for flashing the BIOS will be on the manufacturer's website.
IMPORTANT: I highly recommend you do not flash your BIOS unless there is a specific "compatibility" update for Windows 10, or a CPU microcode update. The reasoning here is that if the flash fails, it will brick your motherboard - unless you have a BIOS backup chip, which is only available on certain models. The only way to fix a bad flash is to ship the entire computer / laptop to the manufacturer and have them re-flash your BIOS chip. This costs time and money.
Finally: Download and Install Windows 10
The final step here is to download Windows 10 using the Media Creation Tool - I've provided full details on how to do that. If the Media Creation Tool doesn't work you can also try the Windows 10 Tech Bench version which downloads the ISO directly from Microsoft without the Media Creation Tool.
Ideally you should install Windows 10 from the desktop as this is the way Microsoft wants you to do it. However, if it fails to install from the desktop you can also try rebooting the system and install that way, as this is now allowed since the Windows 10 November, 2015 Update. You will need your Windows 7 or 8 CD Key to do the installation; you can use Magic Jellybean (free) to extract the key. Ignore any antivirus warnings stating the program is not safe (it is safe).
If you found my instructions helpful please link to this page or share through Facebook, twitter, etc. Much appreciated!
Update 20171112: Microsoft has recently released news that the free upgrade to Windows 10 will end on December 31st, 2017. If you install Windows 10 beyond that (after downloading it using the Media Creator tool, for example), you will be asked to activate Windows 10. The only way to do that is to purchase a Windows 10 license.
RE: "HELP ME PLEASE! Is my CPU Compatible?"
I appreciate the kudos from people telling me how this article was helpful to them, but at the same time I am also overwhelmed with emails from folks asking me if their CPU is compatible. I kindly ask that you please don't email me your CPU specs asking me this question.
Instead, do the following:
-
Download the windows 8.1 upgrade assistant. If your CPU is compatible
for Windows 8.1, you can run Windows 10 64-bit. Update 20160729: Microsoft
pulled the link on the Windows 8.1 upgrade assistant and replaced it with a
Windows 10 FAQ (bastards!). You can still get the Windows 8.1 upgrade
assistant from softonic.com; I refused to link to their site - reasoning:
they will ask you for your email address just to download the file, then
spam you with their newsletter. If you grab it from them, I suggest you use
a junk email address. If you find a better link, email me.
- If your CPU does not pass the Windows 8.1 upgrade assistant, then you
can instead run Windows 10 32-bit - I'm 99% sure of that and have
upgraded lots of systems that did not pass the Windows 8.1 upgrade assistant
/ Windows 10 CPU compatibility check. That said, if you run Windows 10
32-bit, you can only use up to 4GB of system memory - so keep that in mind.
For example, you may have an older Xeon E5420 processor that is currently running Windows 7 64-bit just fine and you have 8GB of RAM, but your old motherboard may not support the Xeon Family (CPU) micro architecture properly and therefore fails the 64-bit CPU upgrade assistant check. (For the record, I have experienced exactly this case). In that case, you need to decide if "upgrading" to Windows 10 32-bit is worth losing the extra RAM. In my opinion, it would not be - but that is your choice to make. :)
RE: "Please! There must be another way! I swear my CPU is compatible!"
If you are hell-bent on the fact that your CPU is indeed compatible and have tried everything on this page to make it work, there is one last thing you can do:
- Backup your entire C drive (hint: use a disk image)
- Format the C drive
- Reinstall Windows 7 or 8
- Download enough updates to get Windows 7 Service Pack 1 or Windows 8.1 (enough to qualify for Windows 10 free upgrade)
- Attempt to upgrade to Windows 10 again
- Restore all your user data
- Reset file permissions (correctly) on your user data
- Reinstall all your programs again
I have had users email me in the past telling me this worked when all else has failed. This is a very drastic measure, however, if you go this route and you intend to restore your user data from the backup, you will need to reset file permissions on the data properly - otherwise you won't be able to access your files. You will either get "Access denied" while trying to open or write to the files, or the folders will simply appear empty. This is rather technical and beyond the scope of this article - and doing it the wrong way could hose your operating system. You've been warned!
In either case, you are welcome to contact me for assistance - I can help with the file permissions OR I can do all of the above steps for you using my remote desktop support service (paid support). To do so: please clearly state your intention (I.E.: that you need to reinstall Windows due to the CPU not compatible error), and I will do my best to get back to you. Please do not email me asking me why your CPU isn't compatible and "what should I do next?", otherwise I will simply delete the email - much thanks. If you still don't know what to do, start from the beginning of this article and make your way down - read it carefully. This article is very definitive in how to resolve the error.
Other Questions Related to Windows 10 Upgrade
We've recently answered more questions related to Windows 10, including in-place upgrades and clean installs. Feel free to read more:
- How to Fix: Windows 10 Upgrade Failed Error 80240020
- Can I Cancel my Windows 10 Reservation and Reserve Later?
- How to Clean Install Windows 10 using Windows 7, 8 License
- No Service Packs For Windows 10; Support ends 2025
- Will Windows 10 Install Automatically?
- Windows 10 Upgrade: Do I have to Reinstall Programs?
- Windows 10 Upgrade: Can I choose 32-bit or 64-bit?
- Which Version of Windows 10 Will I Get (Home or Pro)?
- How to Reserve Windows 10 Upgrade (Free)
- How to Fix: CPU Not Compatible with Windows 10 Error
- Windows 10 Upgrade: Can I keep my Old Windows Install?
- How to Cancel Windows 10 Reservation (Properly)
- Download Windows 10 .ISO (DVD) for Clean Install?
- Microsoft: Windows 10 Will Be The Last Version
- Windows 10 to Natively Support iOS, Android Apps
- Does Windows 10 require the CPU to support PAE?
- Windows 10: Can I Upgrade or do I need a Clean Install?
Got a Computer Question or Problem? Ask Dennis!
I need more computer questions. If you have a computer question -- or even a computer problem that needs fixing -- please email me with your question so that I can write more articles like this one. I can't promise I'll respond to all the messages I receive (depending on the volume), but I'll do my best.
About the author: Dennis Faas is the owner and operator of Infopackets.com. With over 30 years of computing experience, Dennis' areas of expertise are a broad range and include PC hardware, Microsoft Windows, Linux, network administration, and virtualization. Dennis holds a Bachelors degree in Computer Science (1999) and has authored 6 books on the topics of MS Windows and PC Security. If you like the advice you received on this page, please up-vote / Like this page and share it with friends. For technical support inquiries, Dennis can be reached via Live chat online this site using the Zopim Chat service (currently located at the bottom left of the screen); optionally, you can contact Dennis through the website contact form.
Rate this article:
Category:
Need Help? Ask!

My name is Dennis Faas and I am a senior systems administrator and IT technical analyst specializing in technical support and cyber crimes with over 30 years experience; I also run this website! If you need technical assistance , I can help. Click here to email me now; optionally, you can review my resume here. You can also read how I can fix your computer over the Internet (also includes user reviews).
My name is Dennis Faas and I am a senior systems administrator and IT technical analyst specializing in technical support and cyber crimes with over 30 years experience; I also run this website! If you need technical assistance , I can help. Click here to email me now; optionally, you can review my resume here. You can also read how I can fix your computer over the Internet (also includes user reviews).
We are BBB Accredited

We are BBB accredited (A+ rating), celebrating 25 years of excellence! Click to view our rating on the BBB.
Comments
'Get Windows 10' app not running in my tray bar
Dennis, my wife and I each have the same model of Dell laptop bought at the same time.
Her's has the 'Get Windows 10' app running in her tray bar, mine does not. I followed your instructions about updates and checks and I still don't get it in my tray bar.
Thanks, Michael
Check this Microsoft page about the Win 10 app
Hi Michael
No need to be worried if it isn't running. Go take a look at:
http://answers.microsoft.com/en-us/windows/wiki/windows_10-win_upgrade/how-to-reserve-your-free-upgrade-to-windows-10/6c5fa167-467a-42f4-b4d2-91ac2be43c31
Further down on the page is this statement "This update is not required to get Windows 10, you can still get it even though you don't get the notification. Just download it on July 29th 2015 when it becomes available. You will have one year to do so. The Reserve app is just a reminder/notification for its availability."
Just keep your machine updated and when Win 10 becomes available download it and install it. In the meantime your app may appear in your taskbar while you are waiting.
Scenario #2:How to Ensure your CPU is Compatible with Windows 10
Good day
I've downloaded the program CPU-Z and found out in the instructions heading that i only have MMX,SSE,SSE2,SSE3,SSSE3,EM64T but i dont have either the VT-d/VT-x (which is required for NX support as you stated). Is there a fix on this?. Because after i apply the patch and enable the EDB in the BIOS, still the W10 upgrade says CPU not supported.
my cpu is P6100 2.00GHz
NX might not require VT-d/Vt-x
incuboy_mae_5071 said that NX requires VT-d/Vt-x, but I'm reasonably sure that's incorrect. After some intense effort in August to get the Upgrade of Windows 10 on a pair of identical Acer Aspire One's with Intel Atom N455 1.6GHz and a complete surrender I decided to try again this week. I was successful with both. Following directions from a recent article I can't find anymore I installed CPUID (CPU-Z) to check compatibility. The article explained that the designation of NX came under another heading in the information supplied in that little gem. I was indeed lacking in VT-d/VT-x but I tried on the first Acer anyway and the install was successful. I found it helpful to delete and let the graphics driver reinstall after, as I noticed some glitching. I also had some remnants of uninstalled Microsoft Security Essentials that were causing a maxed cpu issue but I worked through that and ever since I've been happy. On the second Acer I had trouble with the 10 installer saying my processor wasn't NX compatible and found this super article. Thanks. I didn't used the steps outlined because the comment by darran_5548 below, used opposite to his success worked (see my comment under his).
NX Enabled in BIOS
I have confirmed that my Intel I5 - 3ghz CPU is enabled with NX but I still get the error message saying my CPU is not compatible.
Can I still install Win 10 from the download I did with the Media Creation tool?
I have Win 7 Home 32 bit
Thanks
Dell Latitude E6420 Windows 10 CPU not compatible error - fix
"Even if your CPU supports NX (no execute bit), you may still need to enable the feature in BIOS in order to pass the Windows 10 CPU Compatibility check"
I just spent hours on this problem with a Dell Latitude E6420 with a Core i5-2520M CPU which I know meets the requirements above. I even used CPU-Z to make sure. I tried everything suggested above, updated the BIOS to different versions, reset the BIOS to defaults and configured it multiple times.
The setting in question is called "Enable CPU XD Support" under Security in the Dell BIOS and defaults to checked/on. However this does not pass the check in the Windows 10 app in the taskbar, and you cannot perform an in-place upgrade using the media creation tool either via USB boot or from within Windows if this occurs. Try it if you don't believe me.
For anyone finding this post with a Dell machine - here's the fix that worked for me: Try un-checking the box for "Enable CPU XD Support" under Security in the Dell BIOS. Amazing it worked for me - once Windows 10 was installed and working I turned it back on again. Works perfectly. Unbelievable.
Good luck!
Found Fix for CPU Not Supported
Hi Dennis,
Thanks for the information on your page. It has been extremely helpful. However, after following all the instructions, including the link to the one about using the Media Creation Tool, I was still unable to install WIN10. I even resorted to contacting the Microsoft Support chat service (but they were not helpful at all).
Anyway, thanks to your guides and areas to try, I did come across something that is not in your solution that did work for me.
Even though my CPU was enabled for NX, it was still saying it was not supported. That was until I located a software setting buried in Control Panel / System / Advanced System Settings / Performance / Settings / Data Execution Prevention ...
Mine was set to "Turn on DEP for all programs and services except those I select" - of which there were some non windows programs listed.
I changed the setting to "Turn on DEP for essential Windows programs and services only".
Click APPLY, and then OK'd all the way back out.
I re-ran the SETUP.EXE for your suggested Media Creation Tool, and bingo - no more unsupported CPU processor messages.
I suspect, that doing this before creating a media creation tool and only using the Windows 10 download tool on one's taskbar might also work (but I'm not trying that as now have fully functional Windows 10 Pro PC).
The only other suggestion I have, in the install process for Win10 - when it asks if you want to include critical updates in the install process - DO NOT SELECT. Choose the other option. I did select first and it hung on 32% installation (something about drivers). After re-doing without the updates included - it works.
Again, thank you for all your help, it definitively got me on the right track (just needed one additional check to include).
Regards
Darran
I had to "Turn on DEP for all programs and services except..."
My computer was set on the "Turn on DEP for essential Windows programs and services only" and I was getting the false processor incompatible message. I build on darran, your suggestion, and set it to "Turn on DEP for all programs and services except those I select" and just left the box underneath blank, and that worked to allow me to upgrade to 10 on a Acer Aspire One N455 1.6GHZ. Thanks.
nx problem
I did the same as you. Run setup in the root of the DVD, but still got the error
no nx support in processor. I also run the setup in the source dir of the dvd.
Then I stranded with an error after giving in the product key
My P4 processor support nx, but not the bios. I have win7 installed on my pc
Your mail was my last hope. Who have a solution to bypass the nx check
Ruud
How to Fix: CPU Not Compatible with Windows 10 Error
An exceptionally well written and comprehensive article which worked perfectly for me and my computer built with a Q6600 CPU - Many thanks
Really thanks
You made my day, week and month!! Excellent article. Lot of thanks!
Thanks again
Well done, worked well on elitebook 8440p i5 core M540
Updating BIOS worked for me
Thanks for great article. I tried everything on this page, nothing worked. There was no processor tab in my bios, so nothing I could do there. Then I decided to update bios, and after that it worked. Maybe you could add that to the list of possible solutions.
Good suggestion
Yes - this is another possibility, though for the majority of people it would be under rare circumstances. I will certainly add mention of this in the article.